web analytics

Category: Tech

  • Increase Visitor Length Time on Your Blog

    The end of the latest Copyblogger post. All five links to "related articles" are to other stories on their blog

    So, I’ve been reading Copyblogger lately and I highly suggest that you do too if you are interested in blogging professionally, and one thing I noticed that they do: At the end of their posts they usually have 4 or 5 Related article links, and I know that’s nothing new, but the key is they link to related articles that are on their blog.

    So underneath all of your posts try to increase the number of related post links that link back to posts within your own blog.

    Now, depending on your topic, whether you are extremely focused like an exacto blade on one subject like Copyblogger is, or whether you have many topics like I do, this will be easier or harder to do. Of course anyone consulting someone on building a profitable blog would definitely encourage you to focus on one topic, but in my case, here I am. I have a number of interests, and I like to blog about them at different times. Maybe I’ll start to focus more in the future, but for now, here I am.

    So for someone like me this will be a gradual project, but it will be beneficial for a number of reasons:

    1. I’ll be revisiting older posts in my blog, and it’ll encourage me to research and write more posts within that category
    2. It’ll encourage me to read the current related posts on other blogs and learn more about the topic which will increase my knowledge and interest.
    3. I can curate and iterate the older posts to make them better

    Now, this is more of an art than science. If  there is a really good blog post from another site that is very relevant to your topic, you don’t want to delete that link in favor of one of your posts that may be less relevant or not as good. That would be depriving your readership and decreasing the value of your blog. But it will encourage you to read that other post and learn more from it and maybe even inspire you to write another post of your own based on your new knowledge and insight. Also this process can help your headline copywriting. For instance for this post, I can think of two other posts I’ve written related to blogging. The current headlines of the other two posts are “1 Minute Tips: Enable Easy Contact” which I’m going to change to “One Easy Step to Distinguish Your Blog’s Authenticity” and “JS-Kit: A New Opportunity for Blogging Success” which I’m going to change to “The Best Commenting Engine for Your Blog.” Can you see why I’m doing this? Since I’m putting them in related links it forces me to rethink the titles and make them more interesting and inviting. Also these headlines are more of general interest than the older specific ones, making them more searchable.

    Note, this whole process, gradual and stress free, will get you interested again in curating your blog, adding value for your readership because the links that you do leave in there will gradually be of higher value and your knowledge on the topic will grow, increasing the number of post ideas you have, and making them more valuable as well.

    Hope this little tip helps you and invigorates your interest in your blogs.

    What do you think about this technique? Am I right, am I wrong? Do you have better ideas? Love to hear what you think.

    Related Articles:

    1. An Easy Step to Increase Your Blog’s Authenticity
    2. The Best Commenting Engine for Your Blog
    3. The No. #1 Skill Needed To Become a Successful Blogger
    4. Customize Your WordPress Page Tab Links
    5. Contact Stephen

    *Tip: Screen Capture on a Mac: Command+Shift+3 for whole screen or Command+Shift+4 for a portion like I did above to capture that small shot from Copyblogger.

  • Garageband Tip: Work Behind the Beat

    So I’ve been in the Mac World for over a year now, but I’ve just now entered the Garageband World or recording and the whole idea of recording on a computer. I know what you’re saying, “Welcome to the ’90s!” I know. I know, but you see as much as I’m interested in technology, I also have this reverse energy working. I call them “mental blocks.” In the early ’90s I got a 4 track cassette recorder. I think it was $500. Couldn’t make it work. I don’t know why. I just couldn’t.  Then I bought some multi track software from the local music store. Looked fancy. Only $50. Couldn’t make it work either. I just couldn’t get decent sound into the damn thing. I don’t know what it was. A PC, the drivers, the technology? I don’t know. Just a lot of buzzing.

    Finally in 2001 I got a stand alone “DAW” one of those little BOSS BR things, and FINALLY, something I could simply plug in and play, and though its woefully small GUI (I wouldn’t even call it a GUI) would make the normal musician drive to the local bridge and jump off, I could actually record multi track sound that sounded clear, and a drum machine to boot! I was hooked. My creativity jumped. Then in 2005 I bumped up to the BR-1600, spending $1200 and thought I was in heaven. Even better Pre Amps, better sound, and the ability to program real arrangements, bass lines and customized drumming. I thought I had my studio. So I’ve been working with it ever since, thinking I had it all. All I needed at least.

    Finally though, especially with this gorgeous 20″ iMac screen, I just couldn’t live with the little 1×5″ GUI. I never wanted to do editing because it was just too painful. So I was stressed with every take because I felt I had to get it perfect. I did, because I wasn’t willing to cut and paste or even punch in and out very often. Pain moves folks to action.

    So finally I entered the Garageband world a few weeks ago, cutting my first song on it, “The Darkest Hour Comes,” just recently. Loooooove it. The colors, seeing all the tracks. The loops. Dragging and dropping edits allows one so much freedom, that one can relax and get into the groove.

    So, since I don’t have an interface yet, I’m recording guitars and vocals into the BR and importing the .WAV files into Garageband. (Of course that little pain will have me down to the Guitar Center getting a Presonus Firebox very soon!)

    But in the meantime I’m working on a new tune. Now with the freedom of Garageband (And computer based recording in general) I discovered I can just record away over and over again, not worrying about mistakes, because I know that I can cut and paste the best parts on the desktop and arrange the song with relative ease.

    So finally here comes my tip. I’ve been working on the guitar track today, cutting and pasting away, and I’ve noticed one thing: Even though I’m working with a click track, you’re almost never exactly on the beat, especially at that crucial juncture of the first beat. You’re either a millisecond ahead or behind it. That’s one of the things that makes it sound natural. But if you cut and paste a section that comes in ahead of the beat you’re going to cut out an important part and also hear a little clip. If you cut and paste those sections a little behind the beat, then everything sounds seamless.

    When you’re recording, you can’t consciously decide to be in front or behind the beat, but knowing that you have the freedom to make mistakes does allow you to relax and get into the groove. So if you just keep the tape rolling and make multiple passes (I recorded 6 minutes of passes for a 4 minute song last night) you’re going to have enough material where you have as many backbeats as frontbeats, so you’ll be good.

    Then, when you’re editing look for those sections that have a backbeat to cut and paste with. It’ll make your life a lot easier. And a lot more fun. And when you record enough passes, every once in a while you’ll even be right on the beat.  Those moments are rare (unless your a good musician) but they feel like Luke finally getting those laser torpedos into that right whole of the Death Star.

    The “Death Star” of your anti creative complex explodes and you up your anti to a new level. Oh, shit. I feel Pro-Tools and Logic on the horizon coming forward.

    Comments, Questions, or Suggestions? Love to hear your thoughts.

  • Brighten Your iPhone’s Screen

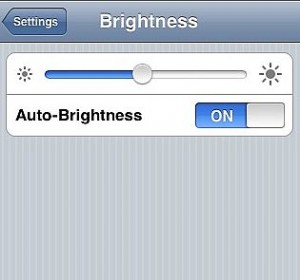
    adjustiphonebrightness-main_Full

    On your iPhone main page click Settings>Brightness and then slide the button all the way to the right. You can also turn off “Auto Brightness” when you lay down to surf or read, to stop it from doing that annoying dimming when you’re trying to see things clearly.

    O.K., before you say I am insulting your intelligence, let me explain. For one, I’ve had an iPhone for a few months and I didn’t know how to do this, and I generally think of myself as half techno-geeky. I’ve also been a computer enthusiast for years and that didn’t stop me from letting a hard drive crash a few years ago with no back up, loosing a lot of valuable stuff. I call these “blind spots” in one’s psychology. So maybe its just me, or maybe some of you out there have them too. I don’t know. We write in order to learn and to remind ourselves and to improve.

    Also, I blog about what interests me at the moment. A couple nights ago, I fell asleep at around 6pm and woke up at 9. I looked over at the digital clock to see what time it was, and it wasn’t on. Didn’t take me long to figure out that the electricity was off in the whole house. First reaction? Did I forget to pay the bill? No, I knew I had.  But anyway it was pitch black. I had no way to see. Except for my iPhone.

    Then I thought about the Flashlight App I had gotten and dismissed as being stupid and somewhat of a scam. But anyway I turned it on. OK, at least I could tip toe around. Around enough to look out the window and see that the whole neighborhood was pitch black too. Whoo, rubbing the sweat off, relieved it wasn’t just me, and that I had somehow forgot the bill. Anyway, it occurred to me, “Can I brighten this thing?” So that brought me Settings and Brightness, and Wahlaa! a flashlight that wasn’t so bad after all. And another benefit of it is that it keeps the screen on, from going into sleep mode so that you don’t constantly have to worry about swiping the unlock button.

    I walked outside, saw a few people wondering the same thing and then a couple of Entergy trucks heading down the main thourough fare.

    The electricity was out for a good three hours. So I came back in sat down in a comfortable chair (that I could find now!) and surfed the web on my iPhone. You know before I almost never surfed the web on the iPhone. Felt the screen was too small, but in this situation I didn’t. And now I am more comfortable and almost enjoy surfing with it, even now that the lights are back on.

    Funny how an electrical outage can ironically turn a few psychological lights on.

    P.S. See even here CNET calls the Flashlight App “Absurd” and I would have heartily agreed, until that night I needed it. One doesn’t always have a flashlight or candle (that’s lit) by one’s bed, but one always has one’s phone. For this particular occasion the $.99 was worth it.

  • Security: How Not to Get Hacked on Public Networks

    https

    When you are accessing a public network of any kind, most commonly the Wi-Fi networks of public areas such as airports and cafes, your browser’s connection to any site can easily be intercepted and your credentials compromised. The most vulnerable area is checking your web email or social networks such as Facebook, Twitter, and Myspace. Most of these sites are indeed secure and encrypted once you are logged in, but the log in page itself, the place where you enter your sensitive information, usually is not. That means you are a sitting target.

    Fortunately there is a way to encrypt and secure your connection to all of your favorite sites before you log in. That way is “HTTPS.” Simply put when you visit one of these sites type in “https://” before the domain name instead of the usual “http://.” This will force your browser to engage in a secure, encrypted connection to the site before you enter in your credentials.

    I’ve notice that my online bank has this type of connection by default, so I assume most financial institutions will too. But make sure yours has that little “s” there in the URL before proceeding.

    Gmail also has the option of permanently using a secure connection under Settings>General>Browser Connection. You may not always want to have this setting on in Gmail for instance when you are in a private secure network, like at home, because you lose some features, but definitely make sure its on before you go out into the wild. Or instead of clicking that setting on and off, you can just type in HTTPS://mail.google.com and your browser will automatically force a secure connection before you enter your password. Paypal is another example of a site that should have https as its default browser connection upon login, but does not. It is secure once your inside but not on the log in page. Make sure you HTTPS it if you are in public.

    Now you are free to take advantage of all those free wifi hot spots out there, feel secure and sleep well at night. Hope this helps

    Comments? Love to hear your take or any other valuable information that you can provide.

    credit: Steve Gibson of "Security Now" 
    a production in conjunction with the TWIT Network, a podcast definitely
    worth subscribing and listening to regularly.
    Subscribe to it HERE on Itunes.

    Related:

  • How to Network A Mac to Ubuntu Easily

    MacUbuntuNW

    On your Mac click the Apple logo in the upper left of your screen then>System Preferences>Internet & Network>Sharing

    Then check the box that says, “File Sharing.” Click the ‘Options’ button and uncheck the ‘Share files using AFP.’ Then check the box that says ‘Share files and folder using FTP’

    Now go to your Ubuntu machine click on ‘Places’ then ‘Network’ and your Mac will show up. At that point you’ll have to enter in your Mac’s username and password. Doesn’t look like ‘log in anonymously’ will work. Now you can transfer files and folders easily from Ubuntu to your Mac. Simply open a folder within the Ubuntu Computer, click the files you want to share (to choose them individually) or from the upper tool bar you can click ‘Select All.’ Then select ‘Copy’ and go to your Mac folders that you’ve opened up in Ubuntu and select ‘Paste’ into anywhere on the Mac that you want to put them. And now all those files are on your Mac in an instant, instead of having to save them to a disc (Oh did I tell you that my CD drive on my old machine was kaput, so that wasn’t an option, and the DVD drive was holding the Ubuntu boot disk) or buying a USB thumb drive (But hey, that wouldn’t be bad, every one needs a thumb drive!)

    It’s that simple.

    Now, the story behind this. I have an older Windows XP machine that got infected a while back when I clicked a supposed link to a video of Paris Hilton having sex (:-)). Anyway, even after removing virus, the damage was done, and although all my files were still there, the bug had hacked my registry to where I couldn’t open the C: drive. Then in an effort to fix it, I tried to use the original XP CD but only made it worse to where I couldn’t even boot windows at all. So Ubuntu comes to the rescue. I boot it from the disk, and I can read all the files on the computer that were originally created on Windows. But all I want to do is get those files off there and on to my Mac. So this does the trick.

    Now, I suppose I would have to install Ubuntu on the hard drive in order for the Mac to ‘see’ the Ubuntu because at the moment, just booting it from the CD I don’t seem to have the choice to “Share Files” but I’m not willing to install Ubuntu onto the hard drive because it will wipe out all my old files. Once I get all the files I want to keep off the old machine, I’ll fully install Ubuntu onto the old machine. Ubuntu is really clean, looks cool, and is a lot of fun. So I’m going to stick with it on this old machine instead of paying for Windows 7.