web analytics

Tag: Logic Pro

  • Why You Must Dither When You Bounce

    Even if you’re keeping the same bit depth.

    The short of it is, that the bounce down, say from 96khz/24bit to 44.1/24bit is going to raise your True Peak and integrated LUFS by .2-3 points. When you apply dithering, it tames that gain to only .1 point. There are technical reasons for this, but the short of it is, my last track I recorded in 96khz/24 bit in logic and for what ever reason when I googled about Dithering, the impression I got was that it was only necessary if you were reducing the bit depth, say from 24 to 16, which has been the common practice for years.

    But lately Spotify, Apple Music, and I assume the others are streaming in 24-bit, so I didn’t feel the need to dither. But then I noticed that jump after bouncing. Dithering solved the problem, or at least most of it. There still was a .1 jump both in True Peak and iLUFS, but not the .2-.3 point jump that you get otherwise. There are three Dithering options in Logic Pro X bouncing: Regular, and two different “Noise Shaping” ones. I tried all three, but at least for my song, they sounded the same and gave me the exact same readings on all the parameters of my Youlean Meter. So I just went with regular, the first choice.

    Here’s a comment I just wrote on a Youtube video by the brilliant “In the Mix” channel that I will link to at the end:

    Looking at those guidelines, does it mean if you keep your TP below 2.0 Spotify will let you get away with a little louder LUFS? The most recent song I uploaded had a TP of -2.1 and an integrated LUFS of -13.4. Since I kept it below -2 TP do you think they’ll let the .6db “slide” so to speak (as we say here in the States,hehhe) or will they reduce it still? The guidelines are a little obscure. They say if you are going to master louder than -14LUFS then make sure your TP is below -2. So I wasn’t quite sure how to interpret that. For sure with indies like myself, the holy grail as it were is to have a sonic quality and loudness that competes with the majors. Oh another think I’ve learned: You’ve got to employ dithering, even if you keep the same bit depth on the bounce or mixdown. I accepted the Youlean measurements within the mix because they were the very last on the stereo buss chain. But the mix down from 96/24 to 44.1/24 even keeping wave lossless bumped up the TP and iLUFS by .2-.3 points. Employing dithering tamed those losses to only .1 And the readouts were exactly the same whether using regular dithering or the two “Noise Shaping” varieties. Cheers!

    Stephen Pickering


  • Mixing and Mastering for Streaming Services Lesson 1

    I have a track I’ve mastered. It’s -14.7 LUFS and -1.2 True Peak. I’m pretty happy with it other than I wish it were about a decibel louder. So I thought I’d try to go for -13.5 LUFS. But it seems whatever I do the true peak is more sensitive to than the LUFS. For instance, the first thing I did was raise the gain on the Multipressor in the master chain from 1.6 to 2.0. The overall LUFS integrated went to 14.4, but the True Peak went to 1.0 which I want to keep under. Should I increase the limiter then? Shorter version of the question: How to increase the LUFS without increasing the True Peak? Thanks! I bought a copy of Levels.

    I do think I have figured out one thing: Just a small bit of audio or so can make your True Peak sky rocket out of the blue while 98% of the mix is well below your target, even though it’s not necessarily audible. Once you identify that bit, and it’s not hard with a metering plug-in like Levels or Youlean, you can create an identical track, cut and copy that bit to it and apply more processing to just it, whether that be a Limiter, faster attack time on your compressor, and then it frees up the majority of the track to breathe! [I made these comments to this video post: https://www.youtube.com/watch?v=BS07ChRkY4M ]

  • How Long Will It Take Me From Song Idea to Release?

    Last night the idea came to me as a melody A-F#-D-A-C-B. I didn’t know what the notes were until I played it on the guitar and this is where the Snarkman was another blessing, since it identifies the notes as you are playing them. Then I was able to surmise that it was over a D-C-G chord movement. I tapped the rhythm as 109 and layed down the first demo on the iPad in Garageband with an accompanying “Drummer Track.” I sang mumbo jumbo which is what I usually do just so I can get the jist of the idea before I go to sleep.

    1:49 pm. Today, I’m going to try writing the lyrics. I’m going to listen to what I mumbled last night and see if I can write some real words.
    2:30pm. I got a first verse, chorus, and half of a second verse, but I had to stop. Or maybe I didn’t need to stop, but it feels like I need to stop for a while, do some other things and let my subconscious go to work. I still struggle with just letting out anything that comes to my mind, which I think you have to do on your first draft. When push comes to shove and its going to press tomorrow you can clean it up, but for now let your mind have some space.
    I think the desire is to make everything so pretty, especially when the music is pretty, so when something comes out that is either nonsensical or not necessarily a pretty image, the impulse is to quash it. I say let it out, especially on the first draft. I’m trying to walk a fine line here with a balance between the subconscious and the conscious. I want to let each have its day in court so to speak. On the one hand if I wait for the subconscious to come up with the most perfect line, it’ll never get done, on the other hand if I just go with the first thing, not trying at all to bring some sense into the equation it won’t have any value either. “Sound and Sense” as my college poetry textbook said. An equal mixture of both. That’s poetry.

    5/19/20

    Well, let’s see. So technically I put in 40 minutes on this yesterday, but as I was doing other things the song remained in my head, and new lyrics started coming to me. Luckily with the Notes App whether I work on it at the desk or when I’m out and about with the iPhone, it all syncs up. Today, technically I sat down with it another 45 minutes or so. Well the end result is, I’ve got two or three pages of lyrics, way more than I need, but they don’t necessarily make sense together. Also, when I sing the ones I have, it just feels like there are better lyrics hiding, but I can’t force it or they won’t reveal themselves. Actually after I wrote for 45 minutes I opened up Soundtrap and layed down a couple guitar tracks. I’m a little stressed about the lyrics. It feels like a delicate line to walk between not rushing them and procrastination. I don’t mind having this creative space at the beginning, but I definitely don’t want it to go on too far. There should be some kind of deadline, but I’m not sure what it should be.

  • Why Did My Cycle Region Turn From Solid Green to Candy Stripped Green in Logic Pro?

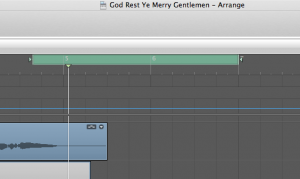
    The normal Cycle Region in Logic is Solid Green

    I’ve been working in Logic Pro the last few days. Every once in a while, I’ll hit something or type something and all of the sudden my solid green “Cycle Region” turns into a Candy Striped Green “Skip” Region. And I don’t know how to get it back!

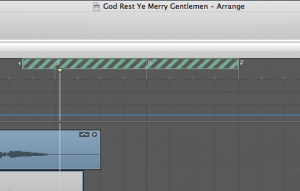
    When it turns into a Skip Region it looks Candy Stripped Green

    Well, Googling I found the answer. Just hit the “J” key on your keyboard. It turns it back and forth from a solid green cycle region into a candy stripped “Skip” region. So all along I must have been accidentally hitting the “J” key.

    Pretty simple, huh? But, dang, I had to dig pretty deep to find the answer. You’d think it would be more straightforward in Apple’s help menu.

    If for whatever reason that doesn’t work for you, you can also click in the top half of the ruler bar, anywhere outside of the existing candy stripped cycle, drag from left to right with your mouse clicker still held down, and that will create a new solid green Cycle Region and automatically the other stripped green Skip Region will disappear.

    *One other neat thing I realized is that you can create a cycle region wherever you are at in the song by simply clicking the top half of the ruler and dragging from left to right. The saves a lot of frustration because before I realized this I would always think I’d have to search for the already pre-existing one and drag it to the place where I was now working.